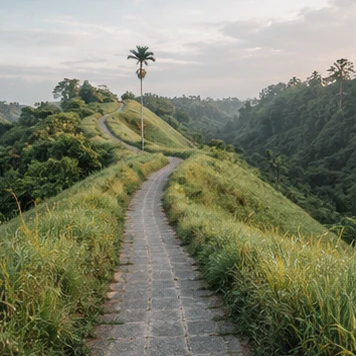
Campuhan Ridge Walk photos can begin with a simple idea: show the path, the greenery, and a person moving through them. The path already gives the frame a direction. You do not need a complicated pose or a long session to make a picture that feels connected to the walk.
Decide how much walking you want before deciding how many photographs to take. A short outing with one useful portrait can be a complete plan. This guide provides composition and pacing suggestions around the app’s Campuhan Landmark; it does not prescribe a measured route, report today’s path conditions, or promise a particular level of access for every visitor.
Set a turnaround before the first photograph
Check your starting point, intended return, and the conditions before setting out. Indonesia Travel’s Ubud guide identifies Campuhan as a walking option and notes that the wider area has hilly terrain. Ask locally about the approach that fits your group rather than judging the whole outing from a photograph of a paved section.
Choose a turnaround that leaves room for breaks and the return journey. It can be a time you agree on or a point you confirm through current local information. What matters is that everyone understands the plan before the search for another photograph starts extending it.
If someone wants a shorter walk, agree on that early. You can still make a path photograph, a personal portrait, and a view of the greenery within a modest outing. More distance does not automatically add a different picture, and the app’s unlock is a location check rather than a reward for completing the whole route.
Give the path a role in the frame
At Campuhan Ridge Walk, look for a permitted position where the path is visible behind or beside the person. Decide where it enters the picture and where the eye should follow it. A curve, a narrowing line, or a change in level can give the image a sense of movement before anyone takes a step.
Place the person where their outline remains clear against the background. If their clothes merge with the greenery, a closer frame may help more than adding a new pose. Check the space around the head and shoulders and watch for a branch or distant edge that breaks the outline awkwardly.
Keep one wider scene picture too. It can show more of the setting while the portrait concentrates on the person. Looking at those two frames together often gives a fuller memory of the walk than trying to fit a large landscape and a detailed expression into every image.
Make a walking portrait with a small repeatable movement
Choose a short section where you can take a few natural steps without obstructing others. Let the photographer frame the picture first. Then walk toward them at your normal pace, looking where you are going rather than trying to perform a long sequence of poses for the camera.
An illustrative request to a companion is: “Keep the path visible behind me and take a few pictures as I walk toward you.” Check the first set before repeating. If the expression and background work, stop there. If one part is missing, adjust that part alone rather than changing the entire setup.
Give other walkers the path when they approach. A short pause is often enough to keep the photo session considerate, and it also gives you time to look at the view. Stay on permitted paths instead of stepping into vegetation to create the impression of an empty trail.
Adapt the picture when the light changes
Look at the person’s face before choosing the background. If the light makes the expression difficult to read, turn the framing or move closer within a suitable place to stop. If the bright sky draws attention away from the portrait, including less of it may make the picture more useful than repeating the same wide view.
Weather and comfort should also change the plan. Check the conditions, carry what you need for the outing, and shorten the photo stop when the return deserves your attention. A picture of soft early light does not show every practical detail of arriving, walking, and getting back.
The Experience name Ridge First Light is a creative option in Unlocked, not an instruction to begin before dawn. You can complete a permitted visit at another time, verify the Landmark in the app, and choose that generated direction later. Use actual conditions to decide when to walk and the app’s creative options to decide how you want a Memory interpreted.
Leave room for what catches your attention
After making the planned portrait, put the phone away for part of the walk. Notice which part of the setting holds your attention without a reference image. It could be the line of the path, a change in texture, or the way the greenery frames the view from a permitted stopping point.
If you photograph a detail, give it a different job from the portrait. A close view of texture can sit beside a wider path scene without needing to identify the entire destination by itself. That variation can help a small set recall the experience of walking, rather than only proving that you stood in one recognizable place.
Back at your accommodation, choose a few images that work together. Remove repeated frames that do not add another expression or view. Keep the picture that brings back the walk even if another one looks more like the travel photograph you saved beforehand.
Confirm the Landmark before leaving its arrival area
Open Campuhan Ridge Walk in Unlocked and choose Unlock inside its supported area. Confirm that the current location check succeeds before continuing away. The app does not treat every path around Ubud, or the whole length of the ridge, as the same arrival area. A nearby photograph cannot replace a check you missed.
After unlocking, choose Ridge First Light, Valley Green, or Path on Film to create a private generated Memory. Select your reference photos and finish that process later if you prefer. The verified visit persists, so the path does not need to become the place where you review every photo and complete every app step.
The Bali collection includes six other Landmarks, each requiring its own visit and unlock. For a different kind of outing, the sea and lake temple photo guide compares Tanah Lot and Ulun Danu Beratan. Plan those journeys separately and keep the generated Memories alongside your camera photographs as creative interpretations of the places you reached.
Useful details
Frequently asked questions
Does Campuhan’s paved path mean every approach suits everyone?
A picture of a paved section does not describe the whole approach or every access need. Check current local directions and conditions for your group before deciding how far to walk.
Must I walk the full ridge to unlock the Landmark?
No route completion is required. Unlocked checks your presence within the Landmark’s supported arrival area; choose the length of the walk for your own comfort, plans, and conditions.
Does Ridge First Light require a dawn walk?
No. The name describes a generated creative treatment. Complete a permitted visit and a successful location check, then choose an available Experience and create the Memory later.
Source notes
Sources
This article was prepared with editorial automation using the source pack below.
- Bali Landmarks and ExperiencesUnlocked
- Ubud and Campuhan visitor contextIndonesia Ministry of Tourism